Canvas’ New Rich Content Editor, First Impressions

The Classic Rich Content Editor that you are already familiar with

If you’ve ever created an Announcement, Assignment, Discussion, Page, or Quiz within Canvas then you’ve already encountered the Classic Rich Content Editor (pictured above) which is the, “…simple, yet powerful, content editor that is available anytime for creating new content” found at the top of the page when you edit any of the elements in Canvas. In January CIT will be launching the New Rich Content Editor (RCE) to all Canvas courses and today I’m going to provide you some initial thoughts on it. Once you’ve read this article, if you would like you can turn on the New RCE in any of your courses (Go to course Settings -> Feature Options -> toggle on RCE Enhancements)

Here is an absolutely captivating five minute introduction to the New RCE from Canvas:

https://vimeo.com/385518017

Ok wake up, so I can tell you a bit about what I see when looking at the New RCE.

A screencap taken from Canvas’ Guide to the New RCE to help us walk through the basic components

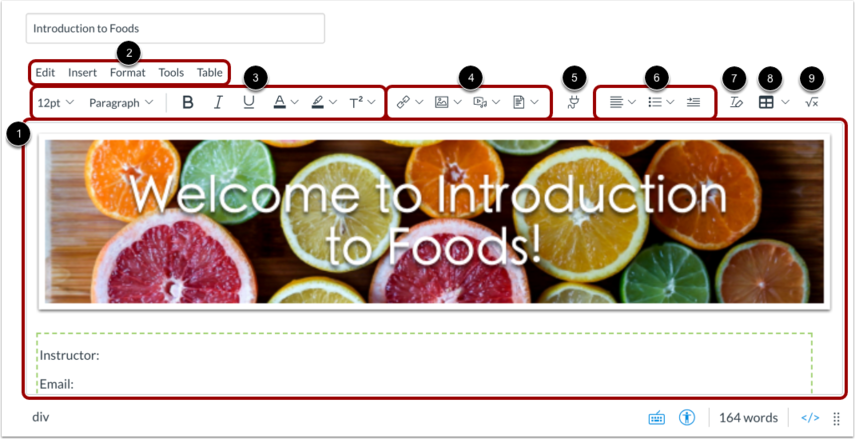
Below I’m going to walk through the numbered items listed above to give you a feel of the similarities and differences between the New and Classic RCE:

  1. Content area– The large block below the RCE is the portion many of you are most likely familiar with. This area allows you to easily type (or copy&paste) text into it and acts as a preview window for the material you may be entering through the RCE options that follow. This hasn’t changed in any significant way.
  2. Menubar– This little bar has a lot of “can do,” primarily providing one stop shopping for items already found in the Toolbar below it; often with expanded features. Yes, much of this is redundant. However, having options in workflow is always appreciated as we all come from differing technical backgrounds.
    • Edit– expanding this option provides easy access to the Undo/Redo as well as traditional Cut/Copy/Paste features for those of you who don’t prefer to use keyboard shortcuts. For those of you who do prefer keyboard shortcuts, they are provided as nice reminder next to each action in the list.
    • Insert– expanding this option replicates all of the insert options in the Toolbar providing an alternative workflow for those more accustomed to a Microsoft user interface. Dogs of any age don’t necessarily need to learn new tricks with Canvas.
    • Format– Easy access to the traditional Bold, Italic, and Underline are all there, but so are other text formatting options like Strikethrough, Super/Subscript- They’re no longer hidden options! Furthermore additional fonts, text/background color, and things no one asked for, like “Directionality” can be found here as well.
    • Tools– includes Word Count to help you keep yourself honest about how verbose you really are and a nifty plug icon that represents “Apps” or Canvas plugins. I’ll talk more about this in the Toolbar.
    • Table– this last tab provides options necessary for quickly editing any… tables (see, it wasn’t just a clever name) you may have inserted.
  3. Toolbar– here’s where we have immediate access to some of the most commonly used text formatting options. I’m particularly excited that they’ve placed font size and type at the beginning of this line as I hope it will encourage individuals to make proper use of headers within pages. Not only do they increase accessibility, but they make the page flow better for fully sighted individuals. That being said, highlighting the font color being so prevalently displayed concerns me, as individuals may get carried away in a fashion that violates ADA requirements.
  4. Insert options– from these quick tabs we can easily insert:
    • Links– By highlighting existing text and selecting this option from the Toolbar you can easily create a link to an External Site or Course Link. What I like best about the way it is now handled is that after creating such a link, selecting it in the Content Area brings up a “Link Options” tab that allows for ease of editing. Additionally, re-selecting the links from the toolbar gives the ability to edit or remove it- no more unintuitive “break link” options to accidentally be clicked or overlooked when actively seeking.
    • Images– this option allows the easy (drag and drop!) upload of your own images, search of Unsplash for copyright appropriate content, or the linking to of an image via URL. Even more, it gives immediate options to apply Alt Text (descriptive text for screen readers that provides low/no sighted individuals an opportunity to experience your images) as you embed the image. Easy + Intuitive = <3
    • Media– This is where things fall down a little for me. The option to upload media directly from your computer (again, in a simple drag and drop fashion) is the first option in this tab. As video files tend to be large and take up a significant portion of one’s course’s disk quota I am concerned many faculty will find the ease of this to cause them issues later in the semester when their courses run out of space. That being said, the Record option seems to provide higher quality video with a more streamline interface than the classic media recorder- even if the Closed Caption feature is deceptive (it doesn’t auto-caption, you need to provide an appropriately formatted file that you’ve transcribed…) Which brings us to the Embed option. While it is no more difficult to use than the classic media embed option, one cannot simply employ a link from YouTube- you have to know to copy the embed code. This isn’t any more or less difficult, but if you’re not aware of what an “Embed Code” is you may find yourself frustrated at first. Learning curves are real, and often off putting.
    • Documents– finally an intuitive means by which to upload (again, drag and drop!) or insert an already present course/user document that doesn’t leave long time users scratching their heads about how to add the, “Auto-open inline preview.” Another way in which we can limit the amount of time we spend mucking about in Files!
  5. External Tools– this replaces the often overlooked (tiny) blue chevron that held the power to access plugins to Canvas tools. It’s now easily identifiable through the plug icon. The first time in I’d recommend clicking “view all” to see what’s available.
  6. Paragraph formatting– while I am glad to see them visible and easily navigable I’d be lying if I said there was anything overly exciting to see here… unless that’s your thing, in which case far be it from me to rain on your parade you crazy paragraph formatting fiend…
  7. Format clearing– Does just that. Highlight the area you wish to remove formatting from and click this icon. Why is it waaay over there, instead of near the text formatting options? I assume to avoid accidental format clearing during late night Page/Assignment creation sessions. Canvas employs safety scissors like this throughout its design that can often seem a bit non-sensical, until the first time you manage to, inadvertently, circumvent their safety precautions.
  8. Insert Table– as the name suggests this is similar to both the old Table functions of the Classic RCE and what one may be familiar with from other products with similar features such as MS Word, Pages, or Google Docs.
  9. Insert Equation– a handy tool for our STEM colleagues to insert mathematical equations and LaTex. I don’t see any major changes from the previous iteration and I suspect those who loved the old version will still love it, and those who didn’t still won’t.
  10. Embed (cloud icon not pictured above)- Since the original draft of this blog Instructure has added a cloud icon to the Toolbar for quick access to the Embed feature. While this is a step closer to what I would like to see in simplifying the media embed process the loss of the media insertion tool (that previously allowed for media embedding from the URL as opposed to Embed Code) is still a hot button issue for me.

In closing, while the New Rich Content Editor preserves the functionality of the classic RCE its new layout is done in an intuitive fashion that highlights many of the features that were previously easily overlooked. While no new functionality is introduced the highlighting of the drag and drop user interface combined with streamlined icons and feature placement are bound to introduce longtime Canvas users to options they never realized they were missing during the content creation process. Hopefully, the introduction of these features will lend themselves to the creation of richer content and an all around better experience for both teachers and learners.

Canvas Release Notes Highlights: Spring & Summer Updates

Canvas operates on a three-week release cycle through which features are added or updated; feature releases in the production environment take place on the third Saturday of every month. SUNY Geneseo’s EdTech team posts highlights from Canvas’s production release notes, a link to these notes, and other relevant content to our blog a few days before the production release, which usually occurs on Saturdays. Please contact the Canvas Support Team if you have any questions about an upcoming production release.

This blog post addresses the Canvas Release, and Ready Release, Notes from March through August. All features described below are available within Geneseo’s instance of Canvas.

Continue reading “Canvas Release Notes Highlights: Spring & Summer Updates”

Alternative Formats in Canvas: Making PDFs More Accessible

Graph of alternative format downloads by Geneseo users from 8/24 to 9/7/2020

When Geneseo’s Canvas added the accessibility program Blackboard Ally in March 2020, a host of new tools became available for both faculty and students. Over the next few weeks, we’ll explore what new powers you have for making course content both more accessible and more useful.

One new item is Alternative Formats, which gives download options without any extra effort on a faculty member’s part. While it’s primarily intended for student use, it offers clear advantages to faculty, as well. And, as you can see, our Canvas users are already putting it to work.

graph showing how many times the alternate formats window was launched, and how many items were downloaded, each day between 8/24 - 9/7
Two weeks into the semester, Geneseo Canvas users have downloaded alternative formats of course files almost 1500 times.
Continue reading “Alternative Formats in Canvas: Making PDFs More Accessible”

Summer 2020 Course Design Incentives

Following the Office of the Provost’s announcement of two new incentives for expanding and improving Geneseo’s online instruction in Summer 2020, numerous questions were received by her team as well as CIT. This post offers guidance for faculty interested in pursuing these incentives and answers the question: “What specific requirements must be met to earn the incentives?”.

Continue reading “Summer 2020 Course Design Incentives”

The Inclusive Syllabus Series: Color

blue-colored orange fruit split open to reveal orange-colored flesh inside

Overview

This is the next installment in a sequence of posts designed to take a close look at the way we design our course syllabi. (Revisit the first post, Fonts, here.) Small, incremental improvements to the design elements of a syllabus provide an easy entry point into making Geneseo courses more inclusive, and more accessible.

This time, an exploration of the wild world of color.

Photo by davisco on Unsplash
Continue reading “The Inclusive Syllabus Series: Color”

#TechTipThursday: Canvas tools to assist with retention, Part 1

Following up to last week’s post, ASSESStivus 2020: Key Takeaway, our focus today is on two of the six Canvas features assisting with retention. Coinciding perfectly with our series on designing an inclusive syllabus, this post highlights Canvas as a syllabus tool in our discussion of contact information and communication.

Canvas as a Syllabus Tool

The syllabus is an introduction of your course to your learners and can be used to set a tone for the class. As such, it is important that your syllabus sets the tone you intend. There is often a propensity to think of the syllabus as a “contract” between professor and the student and include extensive lists of “thou shalt nots” throughout the lengthy document. Thinking of one’s syllabus in such transactional terms can limit our ability to reach our students from the beginning. However, when we think of the syllabus as a communication tool intended to provide our learners the resources necessary to be successful we can begin to identify means by which Canvas can enhance the likelihood that students not only view the material but engage with it.

Syllabus text

While Geneseo stands by a requirement of a making a printable version of your syllabus readily available within your course shell, Canvas can be used to add nuance to how you highlight the details. One way of ensuring that learners are familiar with the contents of your syllabus is to make its content a living part of your learners’ everyday experience. Canvas provides a number pathways to do this. Additionally, by leveraging Canvas to highlight expectations laid out in the syllabus, you can increase learner agency over their education while reducing the amount of time you spend revisiting material clearly laid out in the syllabus.

What follows is a brief introduction to how one might leverage some of the staple elements of Canvas to break-out and communicate key elements of one’s syllabus:

“Week Zero” or Resource Module

Modules essentially create a linear flow of what students should do within a course. Each module can contain files, discussions, assignments, quizzes, and other learning materials; any material you like. Bundling key syllabus related materials into one module can be very impactful. Furthermore, such a module can be set as a prerequisite for the rest of the course ensuring that students do not proceed until they have interacted with this required information and allowing you to track the progress of students through it.

Pages

One of Canvas’ most powerful tools are “Pages.” Pages are analogous to wiki or webpages and allow for the embedding of all manner of rich media, text, or links. Individual pages usually consist of relatively small amounts of information pertaining to the same topic. Pages (as well as other materials) of similar topics are usually grouped into Modules. The use of such tools to deliver content within one’s field of expertise may come naturally, but, using these pages to clarify the meta of the course itself is often overlooked. Below are two types of Pages one can add to their course to expand upon material found in the syllabus and provide context for the class:

“About this Course” page

This is a great place to include the course description from the College Bulletin with an explanation as to how your course will meet that description in less abstract terms. Include links to the materials and resources the course will be using to create an easy reference for students- and yes, this information should already be in your printable syllabus. This page is also a great place to explain how you will be using such materials and tools (including Canvas!) and explain the expectations you have about how students will communicate both with you and their classmates. By providing transparency into your teaching process you can reduce some of your learners’ anxiety; By highlighting it in a bite sized page, independent of your increasingly mammoth syllabus, you can increase the likelihood of students actually reading it.
Life Pro Tip: this is an opportunity to contextualize in real life terms how a learner will benefit from taking this course.

“About the Professor” page

Presumably you are a human. Let your students know that. A short bit of biography can go a long way in establishing a connection with the other (presumably) humans in the class. By explaining to your learners that you will be grading papers in the early morning/late evening because that is when your three year old is most likely to be sleeping, or that if they require office hours after five PM you’ll need to know in advance so arrangements can be made to feed your puppy/elderly dog they are more likely to understand and value odd grade submission times or your desire to hold office hours earlier in the day. Additionally, providing insight into your educational experience- knowing about hard earned certifications in your field as well as your captaining of the fencing squad not only lends credibility to your instruction but humanity to your lessons.

By sharing small insights into your life, both personally and professionally, you can make a connection with your students that will allow you to more easily guide them through the material you are sharing and reduce friction that may come form conflicts of interest. Furthermore, it helps students to make positive assumptions about your decisions. It makes it easier for students to trust you because of the trust you’ve shown them by sharing yourself with them.
Life Pro Tip: the About the Professor page is an excellent place to provide links to contact information and perhaps your Google Calendar where you can establish office hour appointment slots.

Announcements

Announcements allow instructors to communicate with students about course activities and post interesting course-related topics. Announcements are designed to allow instructors to broadcast information out to all members of a course or to all members of sections within a course. Regular application of announcements can be used to reenforce milestones established in one’s syllabus and can be used to tie information back to learning objectives.
Life Pro Tip: Announcements have a “Delay Posting” option which can be used to schedule posts in advance, allowing you to set reminders and other information well in advance of a time that you might otherwise forget.

Communicate Expectations

Generating all of this communication can (and should!) lead to feedback from learners and the beginning of new conversations. As such, it is important to establish expectations as to both how students are to interact with you (email, text, phone, or other) and when to expect a response. It’s infeasible to expect a professor to be on the clock 24/7, however learners often lead very diverse schedules that likely don’t sync closely with your. By not only clearly informing students as to how you prefer to be contacted, but when you will be responding to such contact you will reduce frustration on their part as well as your own. This management of expectations should be supplemented with some information on the content of communications as well.

Whether communicating with you or their classmates we should always encourage our students to interact with members of the class with respect and the understanding that electronic communications are often limited by their inability to transmit many non-verbal cues. Establishing an understanding in regards to class netiquette should bear in mind a few points that can go along way in keeping communications civil:

  • Approach each conversation with respect. It can sometimes be easy to forget that there is an individual associated with the text we are reading. Be mindful of that individual’s thoughts, feelings, and rights.
  • Assume best intentions. Knowing that electronic communication often lacks subtly it is usually best practice to assume no harm on the part of the author of the communication.
  • Act with best intentions. Keeping in mind said limitations approach your communications without malice. This may require a delay in response while one regains composure.
  • Be clear. Ambiguity in electronic communication with individuals we may not know well can leave area to read into it more or less than was intended.

Between your syllabus, the correct mindset, and the appropriate application of Canvas tools, hopefully your learners will have the appropriate entrance into your course and feel confident in their interaction with you and the course materials.

Canvas Release Notes Highlights: February 15, 2020

Canvas operates on a three-week release cycle through which features are added or updated; feature releases in the production environment take place on the third Saturday of every month. SUNY Geneseo’s EdTech team posts highlights from Canvas’s production release notes, a link to these notes, and other relevant content to our blog a few days before the production release, which usually occurs on Saturdays. Please contact the Canvas Support Team if you have any questions about an upcoming production release.

Continue reading “Canvas Release Notes Highlights: February 15, 2020”

The Inclusive Syllabus Series: Fonts

Overview

This is the first in a sequence of posts designed to take a close look at the way we design our course syllabi. These documents are arguably the most important pieces of content we share with students in our classes, and understandably we spend a lot of time and energy crafting what we say in them.

But as we know, it’s not just what we say, it’s how we say it. This blog series, then, will focus on exactly that: the how.

Making intentional design choices in how we structure our syllabus documents allows us to be as inclusive as possible in our course design, right from the beginning. Weaving together principles of Universal Design for Learning (UDL), legal accessibility compliance, and attention to diversity, equity, and inclusion efforts can seem daunting, but this series will highlight a few quick tips that are easy to implement. Getting in the habit of applying these to your syllabus, and eventually other course documents, will greatly improve the Geneseo experience for all our students.

Continue reading “The Inclusive Syllabus Series: Fonts”

ASSESStivus 2020: Key Takeaway

SUNY Geneseo hosted ASSESStivus: Assessment for the rest of us at the start of the spring 2020 semester. This annual event, “organized and hosted by the College Assessment Council…[,] embraces the model of continuous improvement while highlighting assessment initiatives, sharing back information, and utilizing best practices.” Honing in on Geneseo’s Wildly Important Goal and following up to a fall 2019 post, six Canvas-based tools assisting with retention were reintroduced.

Continue reading “ASSESStivus 2020: Key Takeaway”